
")


Purpose of this page is to explain step by step how to use raspiBackup to create a backup imediately and how configure raspiBackup in 5 minutes to create a backup of your Raspberry on a regular base. This page describes for different platforms (Linux, Mac or Windows) how to restore the backup. After testing the backup and restore the next step should be to check which services have to be stopped before the backup starts. Finally cron (starting with Installer 0.4.8 systemd timer) should be configured to start raspiBackup on a regular base. Later on when you have some spare time read this page carefully to check which additional features of raspiBackup are useful for you and update the raspiBackup configuration accordingly. In any case it's strongly recommended to read the FAQ. The raspiBackup installer can be used to uninstall raspiBackup completely if for some reasons raspiBackup does not meet your requirements.
Note: In 5 minutes raspiBackup will be installed and configured if you have basic Linux knowledge. Otherwise you will need more time even the installer helps to create a basic raspiBackup configuration - unfortunately.
Attention
There exists now a complete new raspiBackup documentation that replaces all raspiBackup documention on this website. The content of this page can be found there under this link.
Please read first: Supported hard- and software
Support channels: They are described here
Note
If you find raspiBackup useful a donation is appreciated. For details just click  . In adition it's possibel to become a github sponsor.
raspiBackup - Installation and configuration in 5 minutes
Usage- and configuration examples
Install raspiBackup to create a backup on a regular base
Create backup and test restore
Standard configuration and created files
Invoke installer without menus from the commandline
Use raspiBackup without installation to create a backup immediately
Manual installation and configuration of raspiBackup
Usage- and configuration examples
This page has a lot of usage and configuration examples and should be read before installing raspiBackup. That way you know how to configure raspiBackup during the installation step.
Install raspiBackup to create a backup on a regular base
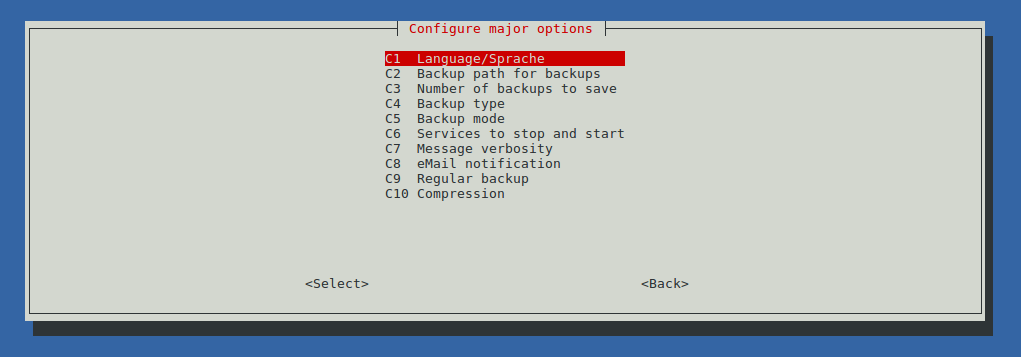
raspiBackup can be installed and configured similar to raspi-config. The installation script uses menus and selection lists. All primary options can be configured with the installer. All other options have to be configured manually in the configuration file /usr/local/etc/raspiBackup.conf. In addition primary options can be updated all the time by invoking raspiBackupInstallUI again. An update menu allows to update the installer and raspiBackup if new versions are available. If there are any issues please report the issue in a comment or even better - create an issue in github.
Note: Users of putty should have remote character set UTF-8 selected in Window -> Transalation. Otherwise garbled characters are displayed as window borders by the installer.
raspiBackup installer and raspiBackup use the configured system language for messages as long as it's supported: Supported languages are English, German, Finnish, Chinese and French. All other system languages will be mapped to English. Any help to add support for other languages is greatly appreciated. For details please read this page.
The current installer can be downloaded, installed and started as follows in the commandline:
curl -o install -L https://raspibackup.linux-tips-and-tricks.de/install; sudo bash ./install
Note: There also exist instructions how to install raspiBackup manually without sudo usage.
Now you can select the install menu which installs raspiBackup by using a standard configuration (see below). All primary configuration options now can be updated in the configuration menu. Finally you can enable the weekly backup run started by cron.
You can start the installer every time in the commandline with sudo raspiBackupInstallUI.shto update the raspiBackup configuration or even to uninstall raspiBackup.
Note: raspiBackups systemd configuration file is located in /etc/systemd/system/raspibackup.timer. Use the installer to update the systemd timer settings in there. Be careful when updating the file manually. This may cause the installer to become unable to update the config file.
If there are any issues with the installer:
The installer creates a debug log /root/raspiBackupInstallUI.log for further problem analysis.
Installation demo
Note
Notifications per eMail require a correct configured local MTAlike postfix, nullmailer, msmtp or exim4. Is Pushover, Slack or Telegram is used the raspiBackup configuration file has to be updated with correct configurationdata first. You can easily test the notification with option -F.
Attention
In particular you should test the restore immediately whenever you use raspiBackup to backup a new System which uses a different or newer operatingsystem version. Every operatingsystem change may change output formats and can cause the restore to fail.
Downloadlinks of raspiBackup and raspiBackupInstallUI
If you want to read the sourcecode of raspiBackup and/or the installer just download them via the following links.
Create backup and restore backup
When you finished raspiBackup installation and configuration create the standard mount point used by raspiBackup to save the backup with (assuming you use the default backup path)
sudo mkdir /backup
Now mount the external device (USB disk USB dongle, nfs drive ...) on this mountpoint. The following example uses an external USB disk or external USB dongle.
sudo mount /dev/sda1 /backup
Keep in mind the filesystem of the backup parition has some dependencies to the backup type. See here for details about the dependencies. In addition don't use the dd backup type if possible. For detaisl why you sholdn't t use dd see here.
Before starting the backup check that you mounted the right backup partition. Following commands will help on this:
sudo blkid -o list
mount | grep backup
or if you have labeled your partition
sudo blkid -o list | grep <label>
Now everything is ready to create a backup. Please note you have to configure raspiBackup to shutdown some services before backup later on when raspiBackup is used on a regular base. Read FAQ18 for details about this.
sudo raspiBackup -m detailed
When the backup finished successfully then it's strongly recommended to restore the backup (Link to restore documentation) on another SD card and test the restored image is consistent and to get familiar with the restore procedure.
Standard configuration and configuration file location
1) Configurationfile /usr/local/etc/raspiBackup.conf
This file configures raspiBackup. Standardconfiguration see following table. The settings can be overwritten with the installer. All other settings have to be updated with an editor or have to be passed as an invocation option.
| Option | Setting |
| Backuppath | /backup |
| Backupmode | normal |
| Backuptype | rsync |
| Language | System language |
| Zip | no |
| Messagedetails | normal |
| Services to stop | none |
| services to start | none |
| Backup number | 3 |
| Weekly backup | off |
| Backup day | Sunday |
| Backup time | 05:00 AM |
For details about the options see here.
2) Weekly backup configuration file /etc/systemd/system/raspiBackup.timer.
This configuration file controls the weekly backup of raspiBackup. It's disabled in the standardconfiguration and can be turned on with the installer.
Next steps
When you created your first backup successfully and also restored it successfully you should check all the available options of raspiBackup on this page and use them if they help you. One important option is -e <eMailAdress>. This eMailAddress is used by raspiBackup to send an eMail with all Messages when a backup run finshed - either successfully or failed. In addition you can exclude directories, reduce the size of dd backups and much more.
Every option can be defined in /usr/local/etc/raspiBackup.conf so you don't have to pass it when you call raspiBackup. There are some options which can be configured only via the config file. For details see the options page.
There exists a nice tool called raspibackupDialog which makes the usage of raspiBackup much more convenient. Read this page how to download and install the tool.
Uninstall raspiBackup
You can use the installer also to remove raspiBackup from your system. Either use the installer menu to uninstall raspiBackup or call
sudo raspiBackupInstallUI -u
Invoke installer without menus from the commandline
If you just want to install raspiBackup with it's default configuration you can do this from the commandline with some options. Any changes of the configuration now can be done manually. Same applies for the weekly backup cron configuration. But you also then can use the installer with it's menus to configure the main options and the weekly backup. Just execute
curl https://raspibackup.linux-tips-and-tricks.de/install | sudo bash -s -- -i
Any further details for commandline options of the installer you will get with
curl https://raspibackup.linux-tips-and-tricks.de/install | sudo bash -s -- -h
Starting with release 0.4.8 of the installer invocation option -t is available which allows to select or switch the daemon used for the regular backup schedule. It's either crond or systemd. Default is systemd.
Use raspiBackup without installation to create a backup immediately
1) Download raspiBackup curl -sSLO https://www.linux-tips-and-tricks.de/raspiBackup.sh
2) Mount your backup partition on /backup or pass the backup partition as last parameter when invoking raspiBackup, e.g. sudo bash ./raspiBackup.sh /media/pi
3) Create backup: sudo bash ./raspiBackup.sh
4) If no dd backup should be created pass the backup type tar or rsync with option -t , e.g. sudo bash ./raspiBackup.sh -t tar or sudo bash ./raspiBackup.sh -t rsync
5) Help for all other options of raspiBackup is displayed with bash ./raspiBackup.sh -h