
- Details
- Category: Raspberry
- Hits: 24660
User Rating: 5 / 5

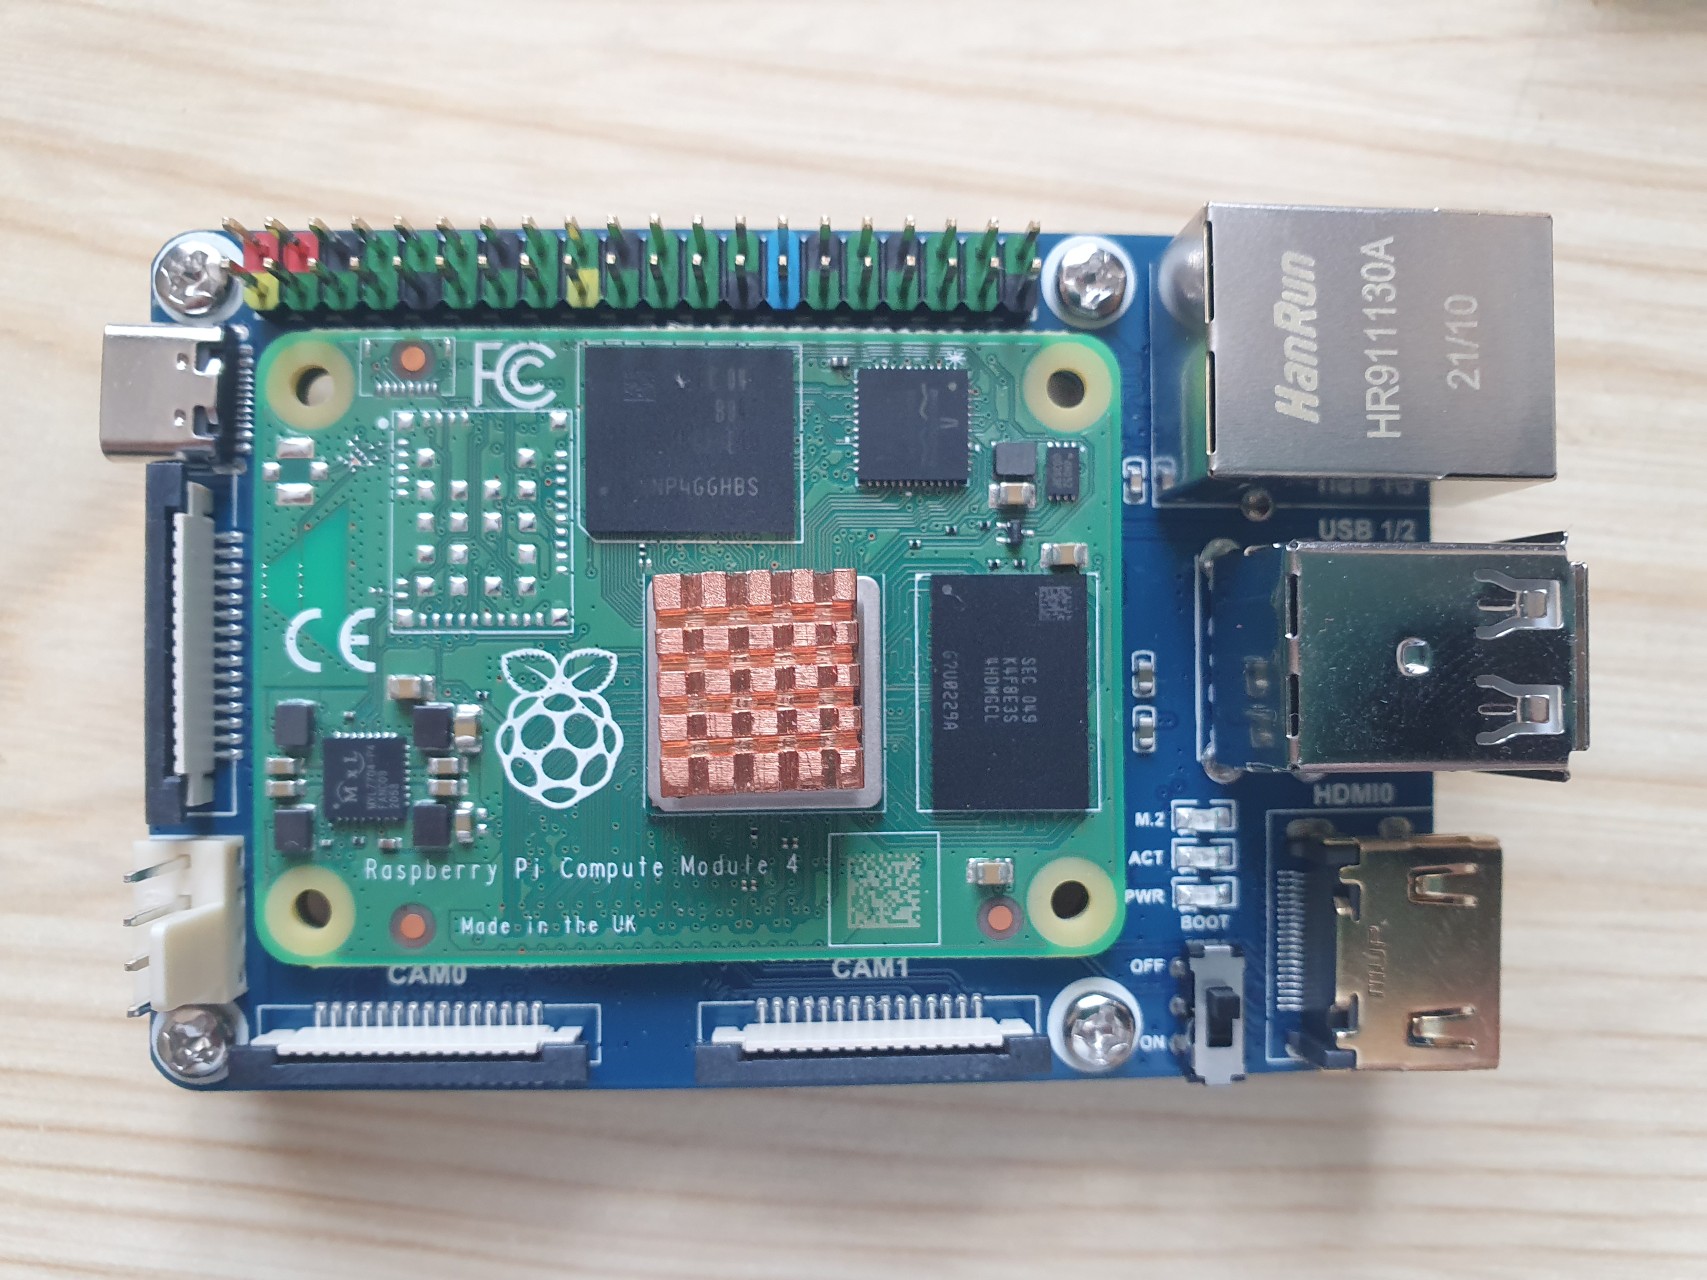
I recently got a compute module 4 (CM4) donated to add support for NVMe in raspiBackup (See here for details). I'm used to use a Raspberry but never used a CM4 before so I had to ramp up on CM4 first. The following page describes how I managed to get a RaspbianOS (Buster) up and running on the CM4 and to boot from NVMe.
My CM4 specs: 1GB main memory, 32GB eMMC and 128GB NVMe from Hynix, no WiFi and a Waveshare Mini Base Board A (CM4-IO-BASE-A).
Note: The SD card slot on the Base Board cannot be used given my CM4 has eMMC and disables the SD card slot.
Parts
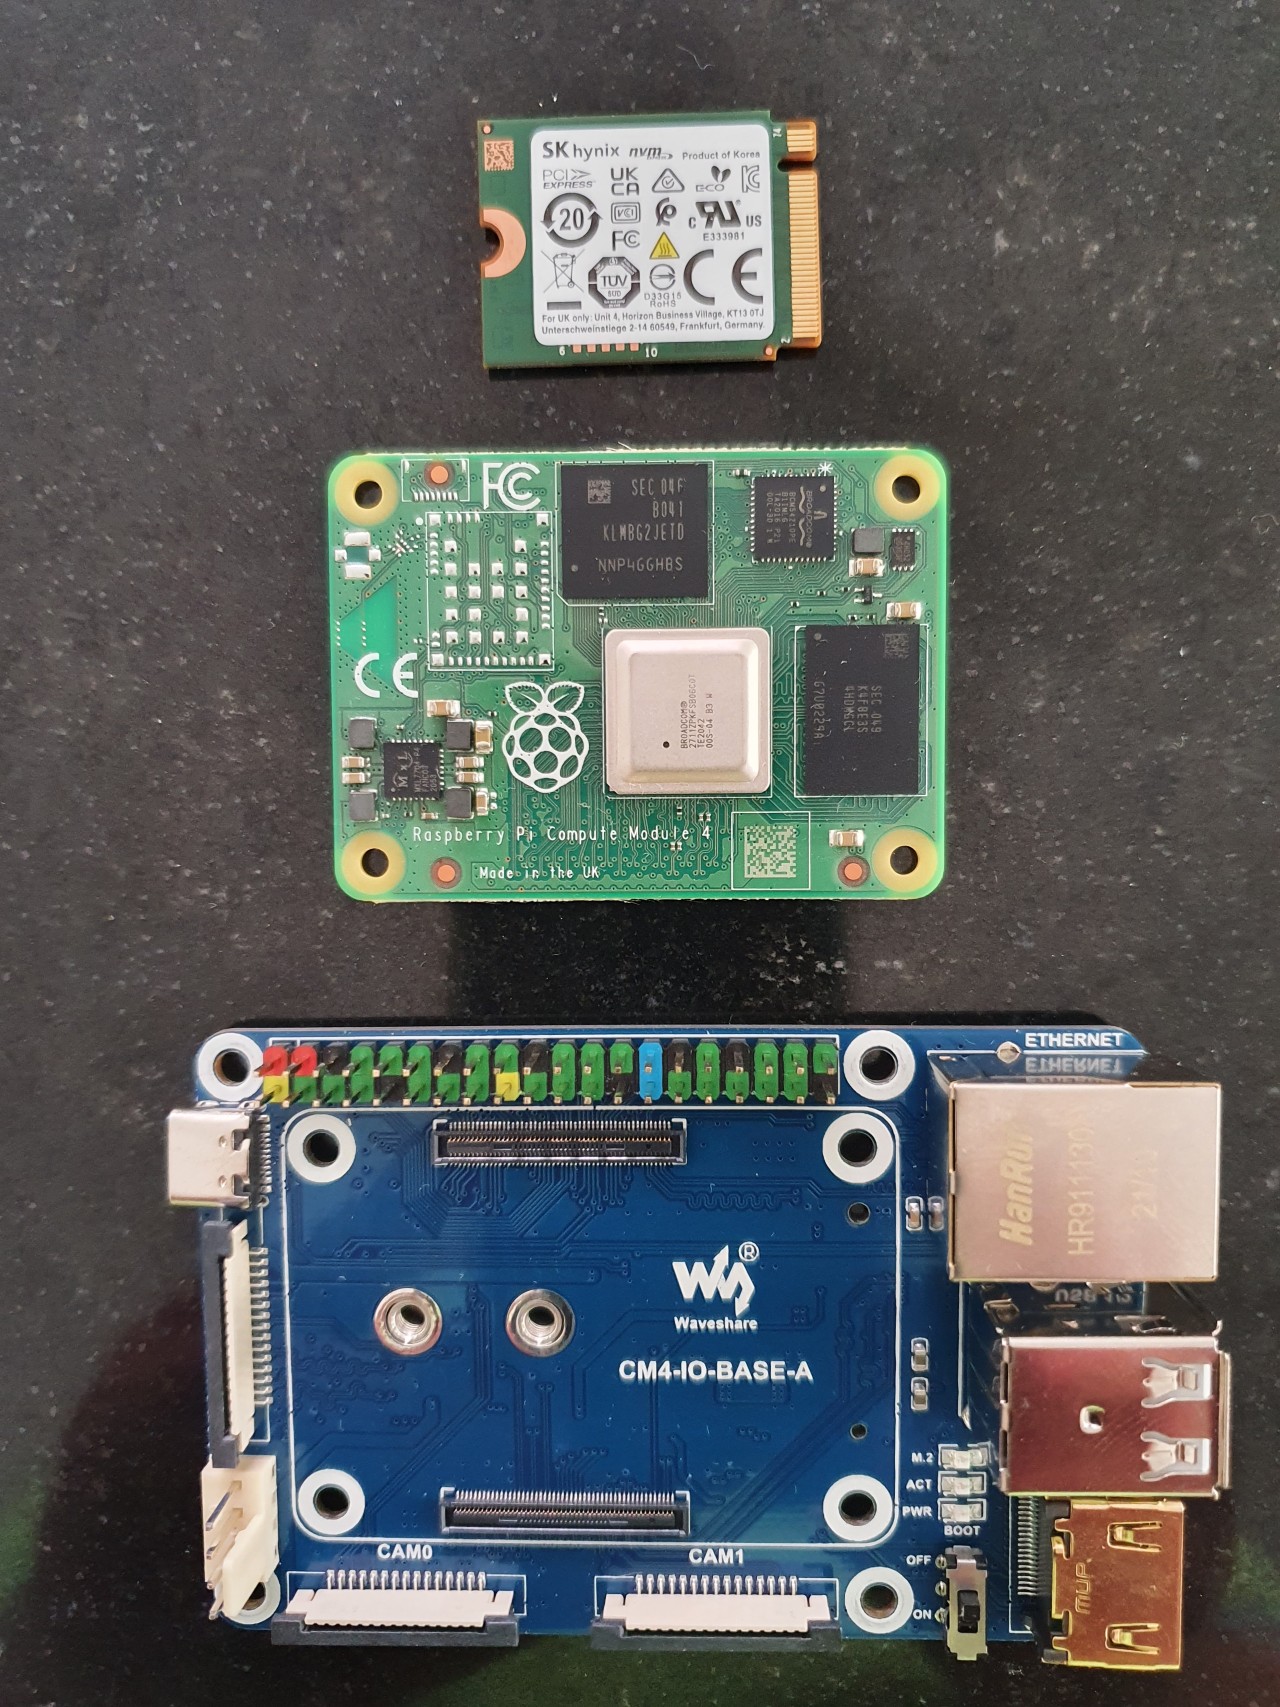
Hynix NVMe, CM4 and Waveshare Mini Base Board A (from top to bottom)
Parts assembled
Read more: Raspberry Compute Module 4 (CM4) setup guide on eMMC and NVMe
- Details
- Category: Raspberry
- Hits: 376

I have an old Raspberry 1B which I want to use to evaluate OpenWrt. I bought two USB32ETH adapters because the RPi1B only has one ETH interface. On following pages I describe the steps I executed to boot the system headless in my home network.
- Details
- Category: raspiBackup
-
Also available:
")
- Hits: 27112
It's possible to add custom code which is executed before and after the backup process via two script extensions. They are useful if modification of the backup script is required to extent the script capabilities and will be lost and thus have to be merged again and again every time when raspiBackup will be updated.
Three sample plugins are available and can be used as templates for new plugins. The first three report the CPU temperature, memory utilization and backup partition usage pre and post a backup run. The last one is called at the end of the backup and can be used to execute different actions depending on the success or failure of raspiBackup.
If you create your own plugin please share it with the community and announce it's availability in a comment. If there is any function missing for the plugin please write a comment and I'll check whether it's possible to provide the missing function.
- Details
- Category: Raspberry
- Hits: 1807
User Rating: 5 / 5
Recently I had to build a Linux kernel on my Raspberry Pi5 and detected the system became quite hot even with an original active cooler. That's the way I monitored the CPU usage and fan speed.
Read more: How to monitor CPU usage and cooling on a Raspberry
- Details
- Category: raspiBackup
-
Also available:
- Hits: 13121
User Rating: 4 / 5
A lot of time people ask how the rsync backup type works and how hardlinks are used. Following article describes what happens when files are created and deleted on the file system in the backup process and how hardlinks are used.
- Details
- Category: raspiBackup
-
Also available:
- Hits: 9927
raspiBackup creates a backup which contains all required information to restore a backup manually. User Micha wanted to restore a backup manually and kindly documented the steps in detail in a comment in German. I transleted his comments into English:
- Details
- Category: raspiBackup
-
Also available:
- Hits: 10891
User Rating: 4 / 5
Depending on the backup method used in raspiBackup you should choose the right filesystem on your backup partition. Following table lists the different filesystems per backup method.
![]() : not possible,
: not possible, ![]() : limited,
: limited, ![]() : possible,
: possible, ![]() : suggested
: suggested
Read more: raspiBackup - Which filesystem can be used on the backup partition
- Details
- Category: raspiBackup
-
Also available:
- Hits: 18349
User Rating: 5 / 5
Following pages describe different usage scenarios and configurations. They should help to find the right usage configuration out of the various configuration options of raspiBackup. Later on these usage scenarios can be customized further. An overview of all option is available here. The different ways to restore a backup are described here.
All configurations which don't use a dd backup save an external rootfilesystem together with the SD boot partition. If the USB bootmode is used and no SD card is used any more the whole rootpartition is also saved.
Usage scenarios described:
1a. A Windows user wants to backup his Raspberry and restore it with windisk32imager on Windows.
1b. A Windows user has a 32GB SD card but uses only 12GB and 12GB should be saved only.
1c. A Windows user wants to use pishrink to create a minimal backup image.
3. Raspberry should be saved on a Samba mounted filesystem, which is provided by a Windows box.
5. A USB boot system backup should include an additional partition.
6. Raspberry should be saved on a local USB stick or a local USB disk.
- Details
- Category: raspiBackup
-
Also available:
- Hits: 9177
User Rating: 5 / 5
I noticed there are a lot of raspiBackup users who use dd as backup method. In particular users which work primarily on Windows use dd because they can restore a dd backup on Windows with win32diskimager or equivilent tools. There is a certain risk with dd which doesn't exist with tar of rasync. That's why I suggest better to use tar or rsync .
Read more: raspiBackup - Why should you better not use dd as backup method?
- Details
- Category: raspiBackup
-
Also available:
- Hits: 9307
User Rating: 4 / 5
Users of raspiBackup in the world (Status 01/2024)
Countries: 70
- Details
- Category: raspiBackup
-
Also available:
- Hits: 7969
User Rating: 4 / 5
raspiBackup can be used to restore a backup to it's original device configuration. There exist 3 configurations:
1) /boot and / on SD card
2) /boot on SD card and / external on a SSD, USB disk or USB flash drive (Raspi2 which doesn't support USB boot mode)
3) /boot and / on SSD, USB disk or USB flash drive (USB boot mode on Raspi3 or Raspi4)
raspiBackup can be used to migrate easily from (1) to (2) or (3).
Read more: raspiBackup - Migrate the Raspberry OS from SD card to SSD, USB disk or USB flash drive
- Details
- Category: raspiBackup
-
Also available:
- Hits: 8864
User Rating: 2 / 5
Whenever an upgrade to a new version of raspiBackup is executed it's tested whether the new version has new configuration options. If there are new configuration options used the local configuration file will be merged into a new file with the new configuration file while upgrading raspiBackup. Following page describes in detail what's going on during a configuration update.
Note
If a version less than 0.6.5 is upgraded the configuration file merge has to be started manually after upgrading. Following command will start the configuration update:
sudo raspiBackup.sh --updateConfig
Read more: raspiBackup - Configuration update when upgrading to a new version
- Details
- Category: raspiBackup
-
Also available:
- Hits: 12419
raspiBackup - Supported hardware and software
raspiBackup is supported with RaspbianOS and Uvuntu and Raspberry hardware only. But raspiBackup can also be used successfully on different Raspberry compatible hardware with different Linux distributions. But note raspiBackup requires the /boot and /root partition used in RaspbianOS.
Just test raspiBackup on your environment and be happy if it works. But if it fails or you get error messages there is no support. You may create an issue in github and append the debug log and I will check whether the issue is minor and it's a low hanging fruit. But in any case the environment is unsupported.
Given the fact raspiBackup is maintained and supported for free
1) It's too expensive for me to buy all possible hardware required for tests
2) it's too expensive for me to setup and execute all test combinations
3) it's to expensive for me to execute all tests every time a new release will be published.
Donations may depending on the effort get me to enable unsupported environments.
raspiBackup checks whether it's running on a supported hard- and software and terminates if it's unsupported. Use option --unsupportedEnvironmentto disable this check.
Attention
There exists now a complete new raspiBackup documentation that replaces all raspiBackup documention on this website.
Subcategories
Page 1 of 6